Hull Repair

Tom Pike, who owns an ENIGMA with a cabin, suggested to me that it might be helpful to others if I described how I repaired the hole in my tiny little micro-cruiser. Therefore, I took a lot of pictures and made a webpage to document the process. In retrospect I don't think the restoration was particularly difficult, but it took longer than I expected it would to fabricate a tight fitting wood patch. Fortunately, both Matt Layden and Jacques Mertens from E-boat in Vero Beach provided me with plenty of marine plywood scraps so it didn't cost me anything to make a few extras until I got it just right.
 To begin with here is a picture of the grey boat that hit poor ENIGMA. To be honest, I never thought that a rowing shell
could do so much damage; but when you consider it is 40 feet long by
16.5 inches wide and was powdered by 4 strong teenage boys, then it's
basically a 700 pound carbon fiber spear.
To begin with here is a picture of the grey boat that hit poor ENIGMA. To be honest, I never thought that a rowing shell
could do so much damage; but when you consider it is 40 feet long by
16.5 inches wide and was powdered by 4 strong teenage boys, then it's
basically a 700 pound carbon fiber spear.
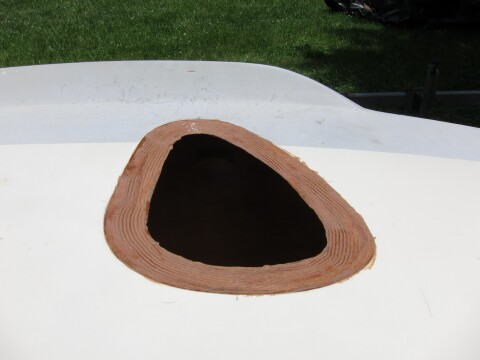
 The
first thing I did was cut away all the delaminated wood. I guess I
could have removed even more material for a cleaner opening in the end, but I was
a little concerned about losing the curvature of the side if I took too
much away.
The
first thing I did was cut away all the delaminated wood. I guess I
could have removed even more material for a cleaner opening in the end, but I was
a little concerned about losing the curvature of the side if I took too
much away.
 Therefore,
I cut and ground off what I thought was the minumum amount warranted,
and I did it in an oval pattern to make fitting the wood easier..
Therefore,
I cut and ground off what I thought was the minumum amount warranted,
and I did it in an oval pattern to make fitting the wood easier..
 Next I beveled the outside about 1-1/2 inches in, and I got around to making the first of three wood patches.
 I began by placing a sheet of plywood over the hole, matching up the grain and then tracing the hole from the inside.
 I created a quick pattern of the outside repair area from clear 6 mil plastic, and then I placed
this template over the plywood with the inner lines already drawn.
I created a quick pattern of the outside repair area from clear 6 mil plastic, and then I placed
this template over the plywood with the inner lines already drawn.
 After cutting out the filler piece, I put it back over the hole to make sure my
inside lines still matched up exactly. Then I took it to my grinder to
make lots of saw dust and a rough bevel.
After cutting out the filler piece, I put it back over the hole to make sure my
inside lines still matched up exactly. Then I took it to my grinder to
make lots of saw dust and a rough bevel.
 I
finished up the bevel by hand and rechecked it on the hull. With
everything perfectly in place, I drilled two 1/16" holes 1-1/2" from the
edges to make aligning the pieces easier later on.
I
finished up the bevel by hand and rechecked it on the hull. With
everything perfectly in place, I drilled two 1/16" holes 1-1/2" from the
edges to make aligning the pieces easier later on.
 I
painted on West System epoxy to both the bevels on the patch piece and the
hull, and a few minutes later I added a thickened mixure of epoxy and
cabosil to the hull.
I
painted on West System epoxy to both the bevels on the patch piece and the
hull, and a few minutes later I added a thickened mixure of epoxy and
cabosil to the hull.
 The
patch was then mated to the hull and held in perfect alignment
using 2 nails in the holes that were drilled earlier. Lead weights were piled on
top to hold everything down flat and even.
The
patch was then mated to the hull and held in perfect alignment
using 2 nails in the holes that were drilled earlier. Lead weights were piled on
top to hold everything down flat and even.
 Underneath
I used a selection of wood sticks, hiking poles and even an old camera
tripod to support the inside of the hull and the thin beveled edges.
Underneath
I used a selection of wood sticks, hiking poles and even an old camera
tripod to support the inside of the hull and the thin beveled edges.
 When
the epoxy cured I ground the edges of the patch level with the
surrounding outside surface, and I sanded the patch slightly concave to
make room for the upcoming fiberglass cloth covering. If I had to
do it again I probably would undersized the perimeter of the patch a bit
more so that it would naturally have sat deeper from the very
beginning.
When
the epoxy cured I ground the edges of the patch level with the
surrounding outside surface, and I sanded the patch slightly concave to
make room for the upcoming fiberglass cloth covering. If I had to
do it again I probably would undersized the perimeter of the patch a bit
more so that it would naturally have sat deeper from the very
beginning.
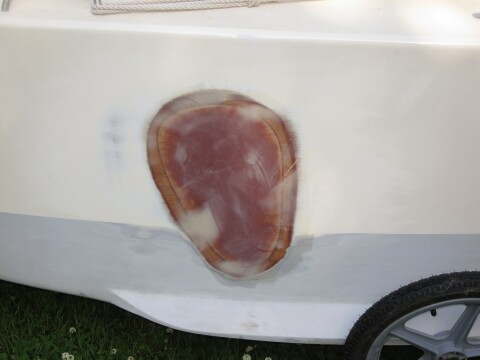
 Then
I glassed the outside with 3 layers of tight weave 3.25 oz glass, and I finished it
off with a thin layer of microballons mixed with epoxy. Since Matt used 2 layers
of this style of cloth in the original construction, I figured the extra layer
of glass would give me something to sand into later on when I was
making everything smooth.
Then
I glassed the outside with 3 layers of tight weave 3.25 oz glass, and I finished it
off with a thin layer of microballons mixed with epoxy. Since Matt used 2 layers
of this style of cloth in the original construction, I figured the extra layer
of glass would give me something to sand into later on when I was
making everything smooth.
 On
the inside I used multiple layers of plain weave 4 oz glass followed by 2 layers of
3.25 oz glass to bring the new surface of the patch level with the
surrounding wood.
On
the inside I used multiple layers of plain weave 4 oz glass followed by 2 layers of
3.25 oz glass to bring the new surface of the patch level with the
surrounding wood.
 After
all the glue cured hard, I sanded both sides of the patch flat, and I
filled in any pin holes or low spots with additional epoxy or filler as
needed.
After
all the glue cured hard, I sanded both sides of the patch flat, and I
filled in any pin holes or low spots with additional epoxy or filler as
needed.
 Now all I have to do is paint.