Bow-roof Shed Project
If you own a boat sooner or later you're going to need a covered
place to work in. Some of us are lucky enough to have a nice
garage or workshop, but there are many of us who are stuck with just
working outdoors. Unfortunately, the problem with doing projects
outside is that your schedule is always dictated by the
weather. If it rains or if it is too cold or too hot, then
you usually stay inside and nothing gets accomplished.
Therefore, one of the first things we did when we got Little
Cruiser was to put together a simple
and inexpensive shelter built from cheap 2 x 2 lumber and 6 mil
greenhouse plastic. This covered space went together easily with a
minimal amount of tools in the course of only one afternoon. For
better or for worse, no real plans were drawn up. Instead, the
rough dimensions of a simple gable roofed building were sketched
out on a scrap of paper. Then the wood was cut
roughly to size, and the framework was quickly joined together
with sheet rock screws. When this somewhat crude 10' x 18'
structure was completed, plastic was thrown over it and the
corners were held down with all the loose cinderblocks we could
find. Unfortunately, it did not take us too long to discover that
one of the main problems with our hastily constructed shelter was
that it did not stand up well to heavy rains or snow because
the rafters were too widely spaced. This oversight
necesitated that we periodically drained off the collecting
puddles of water or cleared off the growing piles of snow on the
roof. Eventually, we remedied this design flaw by
adding a few more rafters. In addition, we noticed
the building tended to twist a bit in high winds and the
plastic cover would sometimes blow off!
Nonetheless, this simple structure served it's intended purpose
for almost ten years until very strong winds from a passing hurricane
toppled it over last summer.
When it came time to getting a new building to replace the
old damaged one, the first requirements were that it be strong and
that it have good rain and snow shedding qualities. This
meant that the roof should be steeply pitched and that the rafters
should be more tightly spaced. Also, we wanted to make sure
that it wouldn't get blown over like our last shelter; therefore, it
would have to be well anchored to the ground. Since we knew
from our past experiences that we would be spending a lot of time
in our new shed, we also thought we should invest a little
more time and money in our project. Even before we
decided to build a new wooden building, we investigated the possibility
of using a metal carport or a prefabricated
greenhouse. However, the greenhouse idea proved to be too
expensive and we felt that the carport with it's metal roof
wouldn't let in enough light to heat the interior for wintertime
use. For this reason, we eventually decided to build exactly what
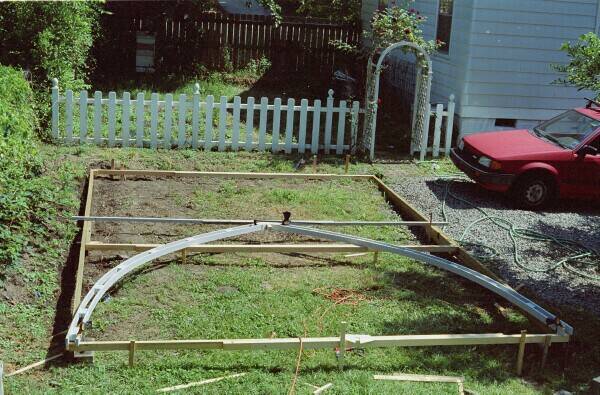
we needed for under $400. This turned out to be a 14' x
20' bow-roof shed designed by Stimpson
Marine. For only $18 and $2 postage and handling, we got a
set of plans, a 25 page builder's manual and a shed design that
has proven itself in 70 mph winds and 9 foot snow
drifts in Maine.
When the plans arrived, we were pleased to see that the
manual was designed for the beginner, and therefore it was quite
easy to understand. The Stimson Marine website claims that
one of their bow-roof sheds can be built in 40 hours; however, we took
considerably longer. This is probably due to the fact that we
milled our own 1 x 3 lumber from 2x 6 stock and that we spent a fair
amount of time making sure everything was fair and straight. The
only real surprise we had during the whole construction was that every
one of our bows had a slightly different bend from the other ones. The
reason this happened was not because we weren't careful in
building our bows but because each piece of wood had
slightly different bending properties. Consequently, when we
released the completed bows from the building form, each
bow sprung back a different amount depending on the relative
stiffness of each piece. Probably the only real way to
prevent this from happening would have been to make the bows out of
many thin laminations of wood rather than the two 3/4" 1 x 3 that are
called for in the plans. In our case it was not be practical to
do this because we did not want to incur any additional building
time nor did we want to increase the expense of
the project. Therefore, to even things out, we paired
up all the similar bows together. Then, when it came time to
make the arches, which are made up of two bows each, we put the
stiffest and tallest arches next to each other while the more
flexible and lower ones were stacked alongside their
counterparts. Ultimately, the tallest arches were on one end
of the building while the shortest ones were on the other
side.
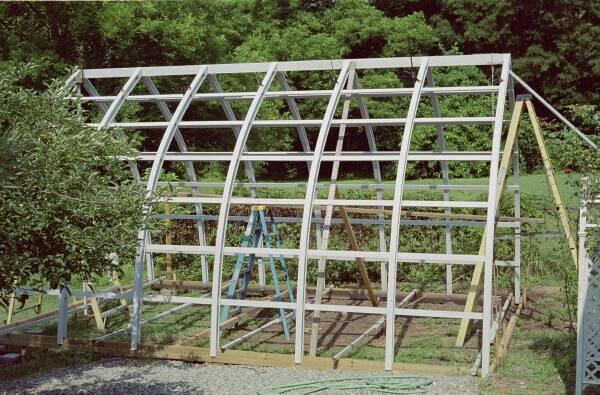
Though we pretty much followed the manual step by step, we did make
some minor changes. One change was to build our arches with
plywood gussets, which enabled us to raise them up as one
unit. Then after three of these arches were lifted up and braced
into position, it was a simple matter to add the ridge pole and to
install the remaining bows. Another thing we did that was
different was to stake the sills next to the bows rather than to anchor
them underneath as the plan suggested. Since we felt that we
could not drive a stake straight enough into our soil to
accomplish this task, we opted instead to simply place a stake
near each bow. We also decided to use a lot of bracing to hold
our sills in place to prevent them from moving around while the
arches were installed and while all the horizontal and diagonal
bracing was attached. Finally, we included diagonal
bracing to the rear of the building to make it even stronger,
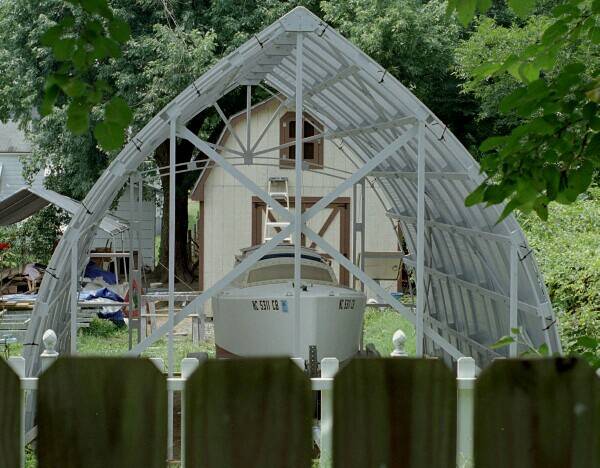
and we built a curved header to support a wide doorway
to make it easy to roll Little Cruiser
in and out of the building.
The last thing we'd like to mention is that we made several
jigs and quite a few templates to make things go easier throughout the
building process. For example, we used a drilling jig to insure
that the one hundred and fourty 1/4" holes in the bows
were straight and true. Another thing we did was to make
wooden hangers to hold the fourteen 20 foot long horizontals in place
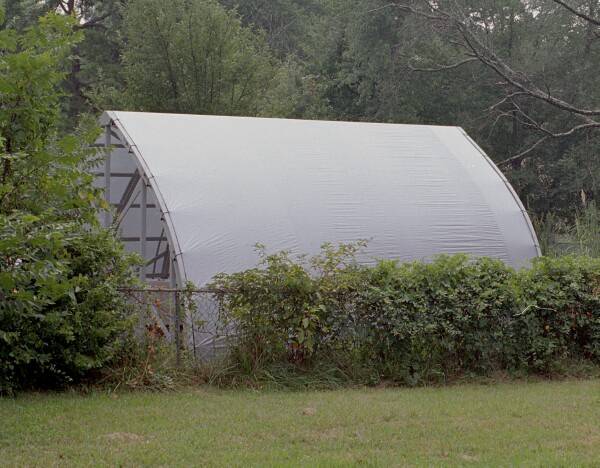
while we screwed them down. To save money we
used a stock grey poly tarp, which we cut down to size; and to
insure the building's longevity, we used galvanized bolts and square
drive deck screws. Incidentally, we plan to swap out
the grey poly tarp with 6 mil plastic to let more light in this
winter. Well, that's about it. Below are some pictures of
our first boat shelter followed by our brand new Bow-Roof Shed.
|
|
|
|
|
|
|
|
|
|
|
|
|
|
|
|
|
|
|
|
|
|
|
|
|